
Getting Started with Terraform on Azure — Deploy Your First Resource
Learn the basics of Terraform on Azure by writing a configuration file and deploying a storage account. Covers providers, variables, data sources, and the init-plan-apply workflow.
- Write a complete Terraform configuration from scratch — provider, variables, data sources, resources, and outputs
- Deploy an Azure Storage Account using the
init → plan → applyworkflow - Learn the difference between
resourceblocks (create new things) anddatablocks (reference existing things) - Verify your deployment with the Azure CLI
Why Terraform on Azure
If you've been clicking through the Azure Portal to create resources, you already know it doesn't scale. You forget a setting, you can't reproduce what you did last week, and good luck handing off your setup to someone else. Terraform solves this — you define your infrastructure in code, and Terraform figures out how to make it happen.
I've covered ARM templates before on this blog, and they're still worth knowing. But Terraform has become the industry default for Infrastructure as Code, especially if you're working across multiple clouds. The syntax is cleaner, the plan step gives you a preview before anything changes, and the ecosystem of providers and modules is massive.
In this post, you're going to write a Terraform configuration from scratch and deploy an Azure Storage Account. It's simple enough to follow in 15 minutes, but it covers every foundational concept you'll use in real projects.
What You Need
- An Azure subscription (a free account works fine)
- Terraform CLI installed
- Azure CLI installed and logged in (
az login) - A resource group already created (we'll reference it with a data source — more on that below)
If you don't have a resource group yet:
az group create --name rg-terraform-demo --location canadacentralWriting the Configuration
Create a new directory and a main.tf file:
mkdir terraform-demo && cd terraform-demo
touch main.tf
Now build out the configuration block by block. I'll explain each piece as we go.
Provider Configuration
terraform {
  required_providers {
    azurerm = {
      source  = "hashicorp/azurerm"
      version = "= 4.17.0"
    }
    random = {
      source  = "hashicorp/random"
      version = "~> 3.0"
    }
  }
}

provider "azurerm" {
  features {}
  resource_provider_registrations = "none"
  subscription_id = "your-subscription-id"
}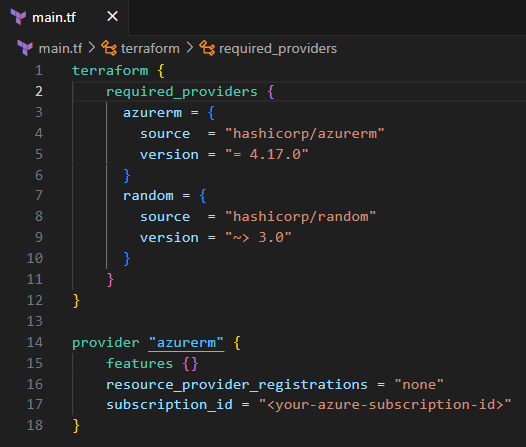
This tells Terraform which providers to use. The azurerm provider handles all Azure resources. The random provider generates unique strings — you'll use it in a moment to create a globally unique storage account name.
To grab your subscription ID:
az account show --query id -o tsvPaste that value into the subscription_id field.
Pin your provider version with = for production configs. The ~> operator allows patch updates which is fine for the random provider, but Azure provider updates can occasionally include breaking changes.
Variables and Data Sources
variable "storage_account_prefix" {
  description = "Prefix for the storage account name"
  type        = string
  default     = "demo"
}

data "azurerm_resource_group" "existing" {
  name = "rg-terraform-demo"
}
Two important concepts here. Variables make your configuration reusable — instead of hardcoding "demo" everywhere, you define it once and reference it with var.storage_account_prefix. You can override the default at runtime without changing any code.
Data sources let Terraform read information about resources that already exist. Instead of creating a new resource group, you're telling Terraform "go look up this resource group and give me its properties." The syntax is data instead of resource, and you reference it with data.azurerm_resource_group.existing.name.
And here's the thing: this is a pattern you'll use constantly. In real projects, your networking team creates the VNet, your security team creates the Key Vault, and your Terraform config references all of them with data sources rather than managing them directly.
The Storage Account Resource
resource "random_string" "random" {
  length  = 8
  special = false
  upper   = false
}

resource "azurerm_storage_account" "example" {
  name                     = "${var.storage_account_prefix}${random_string.random.result}"
  resource_group_name      = data.azurerm_resource_group.existing.name
  location                 = data.azurerm_resource_group.existing.location
  account_tier             = "Standard"
  account_replication_type = "LRS"
}
The random_string resource generates an 8-character lowercase string. The storage account name interpolates the variable prefix with that random string — so you get something like demoxk4f9m2a. Azure storage account names must be globally unique, all lowercase, no special characters, between 3-24 characters. The random string handles the uniqueness for you.
Notice how the resource_group_name and location pull from the data source. Terraform resolves these references automatically — it knows it needs to read the resource group before it can create the storage account.
Outputs
output "storage_account_name" {
  value = azurerm_storage_account.example.name
}

output "resource_group_location" {
  value = data.azurerm_resource_group.existing.location
}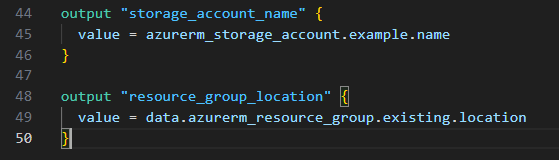
Outputs print values after deployment. They're also how other Terraform configurations or scripts can consume your results — like piping the storage account name into a verification command.
Deploy It
Terraform follows a three-step workflow: init, plan, apply. Every time, in that order.
Initialize
terraform init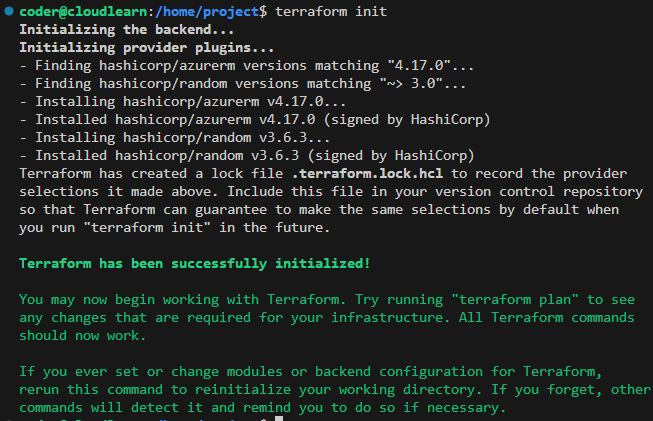
This downloads the provider plugins you declared and sets up the working directory. You'll see a .terraform directory and a .terraform.lock.hcl file appear. The lock file pins the exact provider versions — commit this to version control so your team gets the same versions.
Plan
terraform plan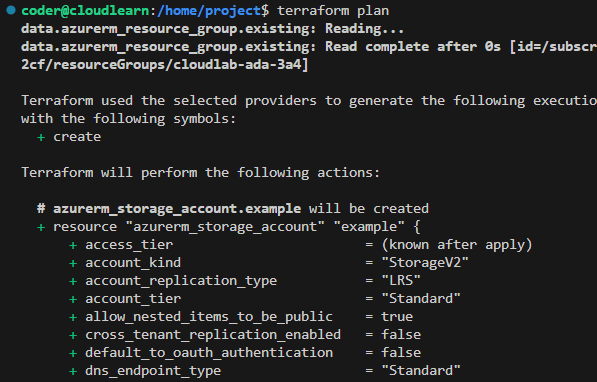
The plan shows you exactly what Terraform will do before it does anything. Resources marked with + will be created, ~ will be modified, - will be destroyed. Read this carefully — in production, this is your last chance to catch mistakes before they hit real infrastructure.
Apply
terraform applyTerraform shows the plan again and asks you to confirm. Type yes and watch it create your resources.
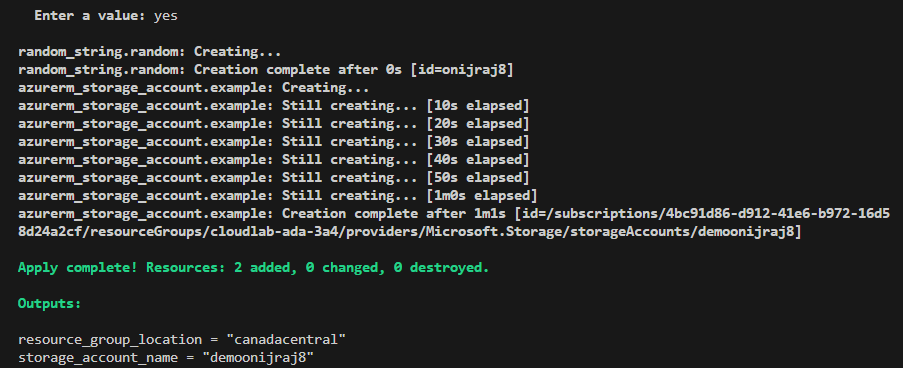
The output shows 2 added, 0 changed, 0 destroyed — the random string and the storage account. Your output values print at the bottom.
Verify
Confirm the storage account exists in Azure:
az storage account show --name $(terraform output -raw storage_account_name)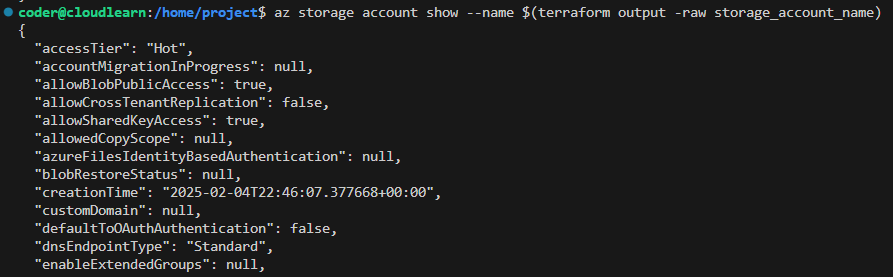
If you see the storage account details, you've just deployed your first Azure resource with Terraform.
What Will Bite You
State File Is Everything
Terraform writes a terraform.tfstate file after every apply. This file is how Terraform knows what it's managing. If you delete it, Terraform loses track of your resources — it'll try to create duplicates instead of updating what's already there. In real projects, store state remotely in an Azure Storage Account backend, never in your local directory.
Never commit terraform.tfstate to Git. It can contain sensitive values like connection strings and access keys in plain text.
Provider Version Drift
If one person on your team runs terraform init without the lock file, they might get a different provider version. This can cause plans that work on your machine to fail on theirs — or worse, produce different infrastructure. Always commit .terraform.lock.hcl and use terraform init -upgrade deliberately when you want to update providers.
The destroy Command Is Real
# This deletes everything Terraform manages — use with caution
terraform destroy
terraform destroy tears down every resource in your state file. There's a confirmation prompt, but in CI/CD pipelines that auto-approve, one wrong trigger and your infrastructure is gone. In production, use lifecycle rules and prevent_destroy to protect critical resources.
What's Next
This post covered a single resource in a single file. Real Terraform projects split configuration across multiple files (variables.tf, outputs.tf, terraform.tfvars), use modules for reusable patterns, and store state remotely. If you're already comfortable with ARM templates, this is a good time to see how the two approaches compare:
Infrastructure as Code with ARM Templates
Why ARM templates are still worth knowing — and how they compare to Terraform.
Want to try this in a live sandbox with a pre-configured Azure environment? The hands-on lab walks through the full workflow:

Introduction to Terraform on Azure | CloudLearn
Learn the basics of Infrastructure as Code with Terraform by deploying an Azure storage account. Master essential commands and configuration concepts.
Read Next
Azure Deployment Stacks Change Everything About Resource Lifecycle
How Deployment Stacks solve the resource orphan problem that Bicep and ARM alone can't — with DenySettings, managed cleanup, and lifecycle awareness.
Infrastructure as Code: Why ARM Templates Are Still Worth Learning in 2025
Bicep and Terraform get all the hype, but understanding ARM templates will make you a better cloud engineer.